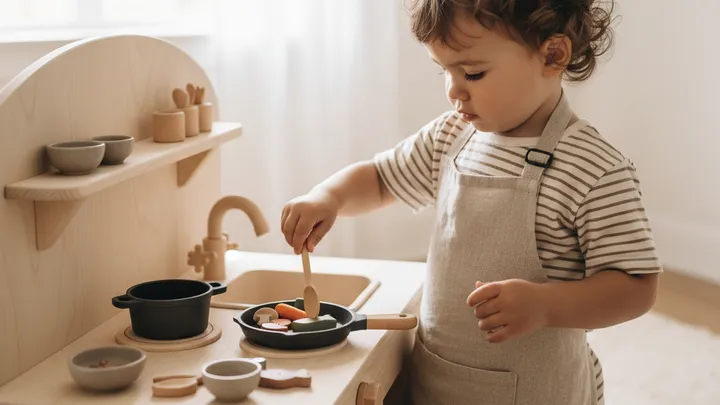
A Montessori play kitchen is not about pretending to cook — it is about practicing the real skills of daily life at child scale. The best ones are made from wood, have realistic proportions, include real or realistic utensils, and are set up at the child accessible height. Pair with real food preparation activities as early as 18 months for maximum developmental impact.
There is a moment every parent recognizes. You are cooking dinner, and your toddler is right there, reaching for the spoon, wanting to stir the pot, fascinated by the running water, trying to open every cabinet. This is not misbehavior. This is your child telling you exactly what they need to learn.
Maria Montessori called these the sensitive periods for practical life — windows of intense interest in the activities of daily living. Children between 18 months and 4 years are driven by an almost compulsive need to participate in real work: cooking, cleaning, pouring, sorting, organizing. Fight this impulse and you get tantrums. Channel it and you get a child who can set a table, prepare a snack, and clean up after themselves by age 4.
A play kitchen is one of the most powerful tools for channeling this drive. But not all play kitchens are equal. The difference between a Montessori-aligned kitchen and a toy kitchen filled with plastic hamburgers and electronic beeping sounds is the difference between developing genuine skills and merely being entertained.
This guide covers how to choose, set up, accessorize, and use a play kitchen the Montessori way, with specific product recommendations and age-by-age activity progressions. For the broader context of practical life in Montessori, see our guide to Montessori practical life activities.
Why the kitchen is the most important room in Montessori
In a Montessori classroom, the practical life area is the first thing children engage with. Before math, before language, before sensory materials, there are pouring exercises, food preparation, table setting, and cleaning. This is not accidental. Practical life activities develop:
Fine motor control. Stirring, pouring, cutting, scooping, and spreading all require coordinated hand movements that directly prepare the hand for writing. Occupational therapists frequently recommend kitchen activities for children with fine motor delays.
Executive function. Making a sandwich requires planning (get bread, get filling, spread, assemble, cut, serve, clean up). This sequential thinking is the foundation of executive function — the cognitive system that manages attention, working memory, and self-regulation. A study published in Child Development found that children who regularly participated in cooking activities showed measurably stronger executive function skills.
Mathematical thinking. Measuring cups introduce fractions. Counting eggs introduces numeracy. Timing introduces the concept of duration. Setting the table for four people introduces one-to-one correspondence. The kitchen is a math classroom disguised as a room.
Independence and confidence. When a 3-year-old can make their own snack, they gain something no amount of praise can provide: genuine competence. They know they can do it because they have done it, repeatedly, with their own hands.
How to choose the best Montessori play kitchen
Material matters
Wood is strongly preferred. A wooden play kitchen provides:
- Realistic weight (doors and drawers feel like real ones)
- Natural sound (wooden spoons on wooden surfaces sound like real cooking)
- Tactile richness (grain, temperature variation)
- Durability (lasts for multiple children and years of use)
- Aesthetic quality (blends into a home rather than screaming “toy”)
Avoid kitchens with:
- Electronic sound effects (beeping, sizzling sounds)
- Flashing lights
- Cartoon character decorations
- Plastic everything
- Bright primary colors that look nothing like a real kitchen
Size and proportion
The kitchen should be proportioned so that the countertop is at the child’s waist height. This means:
- For 18 months to 3 years: countertop at approximately 18-20 inches
- For 3-5 years: countertop at approximately 22-24 inches
- Some kitchens have adjustable legs, which extends usability
The child should be able to reach the back of the countertop without stretching. Depth should be 10-12 inches, not the 18+ inches of adult counters.
Essential features
| Feature | Why It Matters | Must Have? |
|---|---|---|
| Opening doors | Practices fine motor grasp, storage | Yes |
| Turning knobs | Wrist rotation, pretend stove control | Yes |
| Sink basin | Water play, dish washing | Yes |
| Open shelving | Visible organization, accessibility | Preferred |
| Hooks for utensils | Teaches organization, tool access | Preferred |
| Oven with door | Additional storage, pretend baking | Nice to have |
| Refrigerator | Extended play scenarios | Nice to have |
Top Montessori play kitchen picks
Best overall: KidKraft Wooden Play Kitchen
KidKraft Modern-Day Play Kitchen — KidKraft makes some of the most realistic wooden play kitchens on the market. The Modern-Day model includes a stove with clicking knobs, a sink, an oven, a microwave space, and open shelving. The construction is solid MDF and wood, and the muted color options (white, natural, gray) look like miniature real kitchens.
Why it works for Montessori:
- Realistic proportions and design
- Turning knobs provide fine motor practice
- Multiple storage areas encourage organization
- Available in neutral, realistic colors
- Sturdy enough for years of daily use
Price range: $130-180 depending on model
Best for small spaces: IKEA DUKTIG
The IKEA DUKTIG play kitchen remains one of the best values in children’s kitchen furniture. At approximately $89, it provides a birch plywood kitchen with a stove, oven, sink, and upper cabinet. The minimalist Scandinavian design is arguably the most Montessori-looking play kitchen available without custom building.
Montessori parent hack: The DUKTIG’s simple design makes it the most “hackable” play kitchen. Thousands of parents have customized it with real tile backsplashes, painted facades, leather drawer pulls, and other modifications that make it look even more realistic. Search “IKEA DUKTIG hack” for inspiration.
Best premium: Pottery Barn Kids Chelsea Kitchen
Pottery Barn Kids All-in-1 Retro Kitchen — For families who want a play kitchen that looks like furniture, Pottery Barn’s wooden kitchens are beautifully crafted with real cabinet hardware, realistic finishes, and heirloom-quality construction. They are expensive ($200-400) but last for years and often get resold at high value.
Best budget: Melissa and Doug Wooden Chef Kitchen
Melissa and Doug Chef’s Kitchen — At around $100, this is a solid wooden kitchen from a trusted brand. It includes a stove, microwave, sink, and refrigerator in a compact design. The colors are neutral and the construction is decent for the price. For more on this brand’s Montessori alignment, see our Melissa and Doug Montessori toys guide.
Comparison table
| Kitchen | Material | Dimensions | Key Features | Price |
|---|---|---|---|---|
| KidKraft Modern-Day | MDF + wood | 33 x 13 x 38 in | Full kitchen, clicking knobs | $150 |
| IKEA DUKTIG | Birch plywood | 28 x 15 x 43 in | Minimalist, hackable | $89 |
| Pottery Barn Chelsea | Solid wood | 36 x 14 x 40 in | Heirloom quality, realistic | $300 |
| Melissa and Doug Chef | Wood composite | 39 x 15 x 44 in | Compact, all-in-one | $100 |
Essential play kitchen accessories
The kitchen is the stage. The accessories are what make the play meaningful. Start minimal and add items as your child’s skills develop.
Starter set (18 months+)
- 2 wooden or metal pots with lids
- 2 wooden spoons
- 1 wooden spatula
- 2-3 plates
- 2-3 cups
- 2 cloth napkins
- 1 small pitcher for pouring practice
- 1 apron
Melissa and Doug Kitchen Accessory Set — A solid starter set of wooden kitchen tools that are sized for small hands but realistic in design.
Intermediate additions (2-3 years)
- Wooden food cutting set with velcro or magnetic pieces
- Cutting board
- Colander
- Mixing bowl
- Measuring cups
- Pot holders
- Dish rack and small cloth for drying
- Broom and dustpan (child-sized)
Wooden Cutting Food Set — Look for sets where the food pieces connect with magnets rather than velcro. Magnets provide a more satisfying and realistic cutting resistance and sound.
Advanced additions (3-5 years)
- Real child-safe knife (such as a Montessori kitchen knife or nylon knife)
- Mortar and pestle
- Egg timer
- Recipe cards with pictures
- Small containers for sorting ingredients
- Real ingredients for actual food preparation
Parent tip: The most powerful accessory for a play kitchen is not a toy at all — it is a learning tower or kitchen helper stool that lets your child stand at the real kitchen counter beside you. Combine play kitchen practice with real kitchen participation for maximum developmental benefit.
Age-by-age play kitchen activities
18 months to 2 years: Sensory and basic motor
At this age, the play kitchen is primarily a sensory exploration station and pouring practice area.
Activities:
- Pouring dried beans or rice between containers
- Stirring with wooden spoons in bowls
- Opening and closing oven doors and cabinets
- Placing items on shelves and removing them
- Washing dishes in a basin with water and a sponge
- Wiping the counter with a small cloth
What they are developing: Pouring control, grasp strength, wrist rotation, opening/closing mechanics, basic organization concepts.
Real kitchen connection: Let them wash vegetables under supervision. Stir cold ingredients. Tear lettuce for salad. Scoop flour with a measuring cup.
2 to 3 years: Sequence and preparation
Now the child can begin following simple sequences — the foundation of recipe following.
Activities:
- Making a pretend meal with a beginning, middle, and end (prepare, cook, serve)
- Setting the table with a placemat template showing where each item goes
- Cutting play food with a wooden knife
- Following 2-step recipe cards with pictures
- Washing, drying, and putting away dishes in order
- Sweeping the play kitchen area
What they are developing: Sequential thinking, fine motor precision, vocabulary (names of foods, utensils, actions), social skills (serving others), independence.
Real kitchen connection: Make a real sandwich (you prepare, they assemble). Spread butter or cream cheese with a blunt knife. Pour their own water from a small pitcher. Peel a banana.
For more toddler activities, see our guide to Montessori activities for toddlers.
3 to 4 years: Real cooking integration
The play kitchen and real kitchen begin to merge. The child can handle increasingly complex food preparation tasks.
Activities:
- Preparing a real snack from start to finish (wash apple, cut with safe knife, arrange on plate, serve, clean up)
- Following 3-4 step picture recipes
- Measuring dry ingredients
- Cooperative cooking with a sibling or friend (one stirs, one pours)
- Hosting a tea party with real water and real snacks
- Grocery shopping play (making a list, selecting items, organizing in the kitchen)
What they are developing: Planning, mathematical thinking (measuring, counting), extended attention span, cooperative skills, real-world competence.
Real kitchen connection: This child can make a salad, help bake simple recipes, crack eggs (with practice and mess), use a hand mixer with supervision, and set a table completely independently.
4 to 6 years: Independence and creativity
Activities:
- Creating original recipes and recording them with drawings
- Planning and preparing real meals for the family with help
- Organizing the kitchen supplies (categorizing utensils, foods, cleaning items)
- Teaching younger siblings how to use the play kitchen
- Meal planning for pretend restaurants or dinner parties
- Budgeting play (pretend money for grocery shopping)
What they are developing: Creativity, leadership, abstract thinking, literacy (recipe writing), mathematical operations, social responsibility.
How to set up the play kitchen the Montessori way
Location: Choose a spot near the real kitchen if possible. This creates a natural connection between pretend and real cooking. The child can see you cooking and mirror the activities in their own kitchen.
Organization: Every item needs a designated spot. Use:
- Small hooks for utensils and aprons
- Open baskets for food items
- A dish rack for plates and cups
- A small shelf for pots and pans
- Labels with pictures for pre-readers
Rotation: Do not fill the kitchen with every accessory you own. Keep it minimal — 10-15 total items — and rotate monthly. This maintains interest and prevents the kind of cluttered chaos that makes the kitchen feel like a toy box rather than a workspace.
Maintenance routine: Teach your child to clean their play kitchen as part of the play. After each session: wash dishes (real water in a small basin), wipe counters, put items in their places, hang the apron. This is not cleanup after play — it is part of the play, and it transfers directly to real kitchen habits.
Real food integration: Keep a small basket near the play kitchen with real food prep items your child can use independently: a banana, crackers, cheese slices, a small pitcher of water. When they play in their kitchen and get hungry, they can prepare a real snack.
Play kitchen versus real kitchen: the Montessori balance
A common Montessori critique of play kitchens is that children should be cooking real food, not pretend food. There is validity to this — real experiences are always preferable to simulated ones. But the practical reality is:
- The real kitchen is not always available (you are using it, it is not safe for unsupervised play)
- A play kitchen allows independent practice without adult supervision
- Pretend play itself is developmentally crucial (cognitive flexibility, theory of mind, narrative skills)
- Play kitchens extend kitchen learning beyond meal times
The ideal Montessori approach combines both. The child helps with real cooking during meal preparation, and has access to their play kitchen for independent practice and pretend play throughout the day. They are not substitutes for each other — they are complements.
Parent tip: When your child makes you a pretend meal, sit down, use a real napkin, and eat it with proper manners. This validates their work, models social dining behavior, and strengthens the connection between play and reality. Do not pretend to eat — actually sit and engage as if it is a real meal.
Common play kitchen mistakes
Filling it with too many accessories. A kitchen drowning in plastic food, utensils, and gadgets teaches clutter, not cooking. Start with the essentials and add items one at a time as the child masters the current set.
Electronic sounds and lights. A beeping microwave and sizzling stove sounds add nothing to the developmental experience and remove the child’s opportunity to create their own sound effects, which is actually an important part of imaginative play.
Never using the real kitchen. A child who only uses a play kitchen misses the sensory reality of actual cooking — the heat, the smells, the transformation of raw ingredients into food. Make real kitchen participation a daily priority.
Correcting the play. If your 2-year-old is making a soup out of play cookies, wooden fruit, and a wooden egg, that is correct. There is no wrong way to use a play kitchen, and correcting their recipes interrupts the creative process that makes pretend play developmentally valuable.
Gendering the kitchen. All children benefit from cooking skills. If your son is interested in the play kitchen, that interest is developing fine motor skills, executive function, mathematical thinking, and independence — exactly the same skills it develops in your daughter.
A well-chosen play kitchen is not a toy that collects dust in a corner. It is a workstation that your child returns to daily for years, developing the practical skills and cognitive abilities that serve them for a lifetime. Choose one that looks real, stock it simply, use it alongside real cooking, and watch your child become genuinely capable in one of the most fundamental human activities. The pride on a 3-year-old’s face when they serve you a snack they prepared themselves — that is Montessori education in its purest form.